Spa-Style Bath Tray Projects That Are Easy to Sell

Spa-Style Bath Tray Projects That Are Easy to Sell

Spa-Style Bath Tray Projects That Are Easy to Sell

Indulge in a relaxing soak while enjoying your favorite beverage, book, or even a face mask â€" all without leaving the comfort of your tub. Bath trays are a popular and practical item that many people find essential for creating a spa-like experience at home. If you're looking for an easy and profitable craft project to sell, bath trays are an excellent option. They're relatively simple to make, require readily available materials, and cater to a wide audience who value self-care and relaxation.

The best part? You can customize your bath trays to appeal to different tastes and preferences. Think about the materials, colors, and accessories you use to create unique and appealing designs. Here are some ideas to get you started:

Bath Tray Essentials

Before diving into specific design ideas, let's cover the basic components you'll need for a successful bath tray project:

Materials

  • Wooden board: This forms the base of your tray. Pine, cedar, or bamboo are good choices due to their affordability and natural resistance to moisture. Consider using a waterproof sealant to further protect the wood.
  • Handles: Metal, leather, or wooden handles add a touch of elegance and make the tray easier to carry. Choose handles that match the style of your tray.
  • Legs: Foldable legs are a great addition, allowing the tray to sit comfortably on the edge of the tub. You can find legs made from metal or plastic.
  • Waterproof sealant: To prevent the wood from warping or staining, apply a sealant specifically designed for bathroom use. This helps preserve the tray's lifespan and protects the wood from moisture.
  • Optional accessories: Think about what might enhance the user experience, like a built-in wine glass holder, a book stand, or a soap dish.

Tools

  • Saw: To cut the wooden board to your desired size.
  • Drill: To create holes for handles and legs.
  • Sandpaper: To smooth the edges and create a polished finish.
  • Screwdriver: To secure handles and legs.
  • Staple gun: For attaching fabric or other materials to the tray.

Creative Bath Tray Designs

Now, let's get into the fun part - brainstorming unique bath tray designs. Here are some ideas to spark your creativity:

Rustic Charm

This design emphasizes natural elements. Use reclaimed wood for a rustic feel, and add distressed metal handles for an industrial touch. Consider using a natural oil or wax finish for a subtle sheen.

Modern Minimalism

Keep it clean and sleek with a simple rectangular tray made of smooth, polished wood. Opt for minimalist handles in brushed metal or leather. This design is versatile and complements a variety of bathroom styles.

Glamorous Glow

For a luxurious touch, use a high-quality wood like walnut or maple and stain it with a rich, dark finish. Add elegant crystal knobs or handles and consider adding a small LED light to the tray for a spa-like ambience.

Personalized Touch

Offer customization options to make your bath trays extra special. Let customers choose the wood type, finish, and even add a personalized engraving or inscription. You can also offer add-on items like engraved soap dishes or custom-designed bath mats.

Marketing Your Bath Tray Creations

Now that you have your designs in place, it's time to get your bath trays in front of potential buyers! Here are a few marketing strategies:

  • Online platforms: List your bath trays on Etsy, Amazon Handmade, or your own website. High-quality photos and compelling descriptions are essential.
  • Local craft fairs and markets: Showcase your creations at events where people are looking for handmade gifts and home decor.
  • Social media: Build an online presence and share photos of your bath trays on Instagram, Facebook, or Pinterest. Use relevant hashtags to reach a wider audience.
  • Collaborations: Partner with other local businesses like spas or bath product retailers to cross-promote your products.

With a little creativity and effort, you can turn your love for crafting into a successful business selling beautiful and functional bath trays. Offer high-quality products, personalize your designs, and market effectively, and you'll be on your way to creating a relaxing and profitable venture.

Share:

How to Craft Multi-Functional Floating Shelves for Organizing and Displaying

How to Craft Multi-Functional Floating Shelves for Organizing and Displaying

Craft Multi-Functional Floating Shelves for Organizing and Displaying

Embrace the minimalist charm and maximize your space with multi-functional floating shelves. These versatile fixtures offer a dynamic solution for both storage and display, transforming your walls into captivating focal points. Whether you're tackling clutter in your living room, creating a cozy reading nook, or enhancing your kitchen's aesthetic, floating shelves deliver a seamless blend of functionality and style.

Unleashing the Versatility of Floating Shelves

Floating shelves transcend the realm of mere storage solutions. They metamorphose into artistic canvases, showcasing your curated collections, cherished mementos, and prized possessions. Imagine showcasing your prized novel collection, adorning your walls with a tapestry of vibrant artwork, or displaying your succulent garden in a cascade of cascading greenery. Floating shelves effortlessly integrate into any room, bringing a touch of sophistication and personalized flair.

Crafting Your Floating Shelf Masterpiece

The journey to creating your own floating shelves begins with a dash of creativity and a touch of woodworking know-how. Let's delve into the essential steps to craft these transformative pieces:

Gathering Your Supplies

Before embarking on your DIY adventure, ensure you have all the necessary materials at your disposal. Here's a comprehensive list to get you started:

  • Wood boards of your choice: Consider pine, oak, or walnut for durability and a natural aesthetic.
  • Heavy-duty brackets: Opt for sturdy metal brackets designed specifically for floating shelves.
  • Wood screws and a drill: Choose screws appropriate for the wood thickness and bracket material.
  • Sandpaper: Prepare for a smooth finish by employing various grits of sandpaper.
  • Wood stain or paint: Personalize your shelves with your preferred color or finish.
  • Level: Ensure your shelves are perfectly aligned and visually appealing.
  • Measuring tape: Precision is key for accurate measurements and a harmonious installation.

Crafting the Shelves

Now that your materials are ready, let's bring your floating shelves to life:

  1. Measure and cut the wood boards to your desired dimensions. Ensure your measurements are accurate for a seamless installation.
  2. Sand the edges and surfaces of the wood to create a smooth finish. This step enhances the visual appeal and ensures a pleasant feel.
  3. Apply wood stain or paint to your shelves, allowing them to dry completely. Embrace your artistic side and select colors and finishes that complement your room's decor.

Installing Your Floating Shelves

With your shelves beautifully prepared, let's secure them to the wall:

  1. Locate the studs in your wall using a stud finder. Attaching the brackets to studs provides superior stability and weight-bearing capacity.
  2. Mark the locations for the brackets on the wall, ensuring they are level and aligned with each other. This step guarantees a visually pleasing and structurally sound installation.
  3. Drill pilot holes for the screws at the marked locations. Pre-drilling pilot holes prevents wood splitting and facilitates a smooth installation.
  4. Secure the brackets to the wall using the provided screws. Tighten the screws firmly for a secure and unwavering hold.
  5. Slide the shelves onto the brackets, ensuring they are securely seated and balanced.

Decorating Your Floating Shelves

The final stage is where your creativity truly shines. Decorate your shelves with a curated collection of items that reflect your personality and style. Here are some inspiring ideas:

  • Organize your books in an aesthetically pleasing arrangement, highlighting their colorful spines or covers.
  • Display framed photographs, artwork, or botanical prints, adding a personal touch and a visual focal point.
  • Create a miniature herb garden with potted succulents or small plants, adding a touch of greenery and freshness to your space.
  • Showcase your prized collectibles, such as vintage cameras, antique figurines, or handcrafted ceramics, transforming your shelves into a curated display of your passions.
  • Embrace the trend of layering by stacking books, placing small decorative objects on top, and incorporating small potted plants for a dynamic and visually appealing presentation.

Floating shelves are more than just functional fixtures; they are artistic expressions of your personal style and taste. With a little creativity and attention to detail, you can transform your walls into breathtaking galleries, showcasing your treasures while keeping your belongings organized and readily accessible. So unleash your inner designer, gather your supplies, and let your imagination run wild as you craft your own stunning floating shelves.

Share:

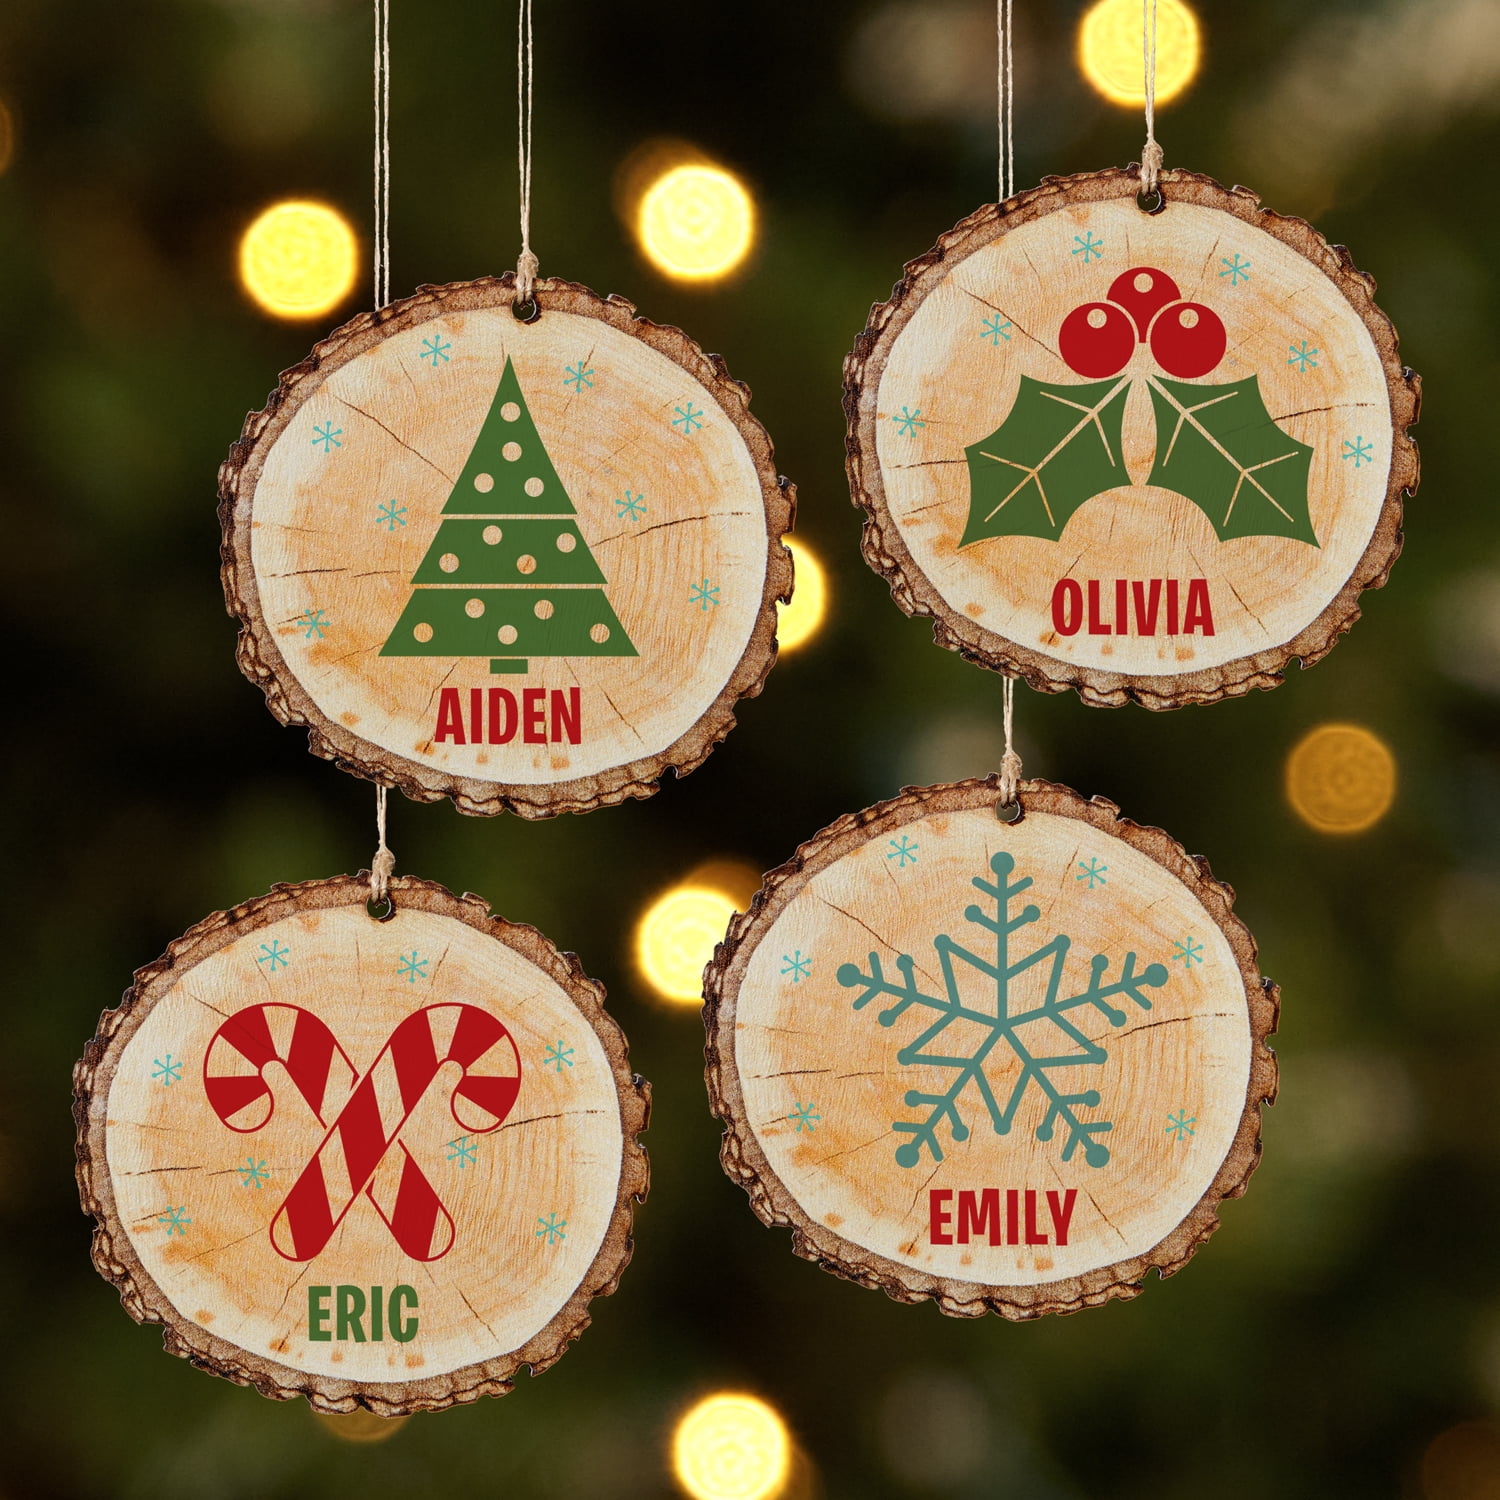
Personalized Christmas Wood Ornaments to Make

Personalized Christmas Wood Ornaments to Make

Personalized Christmas Wood Ornaments: Handmade Gifts That Warm the Heart

There's something extra special about handmade gifts, especially around the holidays. And when you're talking about Christmas ornaments, personalized wood ornaments take the cake. They're unique, sentimental, and can be crafted to reflect the personality of the recipient. This year, why not ditch the generic store-bought ornaments and create something truly meaningful for your loved ones?

The Charm of Personalized Wood Ornaments

Wood ornaments have a timeless charm that evokes warmth and nostalgia. They're a blank canvas for your creativity, allowing you to personalize them with names, dates, inside jokes, or even miniature versions of favorite hobbies or memories. This makes them an extra thoughtful and treasured gift.

Sentimental Value

A personalized ornament can be a tangible reminder of a special occasion, like a wedding anniversary, a baby's first Christmas, or even a shared inside joke. It becomes a treasured keepsake that brings a smile to their face every year when they hang it on their tree.

Unique and Meaningful

In a world filled with mass-produced goods, a handmade gift stands out. It shows that you put thought and effort into creating something unique and special for the recipient. They'll appreciate the extra time and care you took to personalize the gift, making it truly one-of-a-kind.

Durability and Longevity

Unlike fragile glass ornaments, wood ornaments are sturdy and can withstand the test of time. They're also environmentally friendly, making them a sustainable choice for holiday decor.

Ideas for Personalized Wood Ornaments

The possibilities for personalized wood ornaments are endless. Here are a few ideas to get you started:

Family Ornaments

  • Family Names: Carve or paint the last names of your loved ones onto a rustic wooden ornament.
  • Family Portraits: If you're feeling adventurous, use a wood burning tool to create silhouette portraits of your family on the ornament.
  • First Christmas Ornament: Celebrate a baby's first Christmas with a personalized ornament that features their name, birthdate, and a cute little reindeer or Santa Claus design.
  • Couple's Ornaments

  • Wedding Date: Engrave your wedding date on a heart-shaped ornament or a small plaque attached to a wooden tree.
  • Initial Ornaments: Create matching ornaments with your initials intertwined or simply etched on the front.
  • Hobby Ornaments: If you and your partner share a favorite hobby, such as hiking, gardening, or cooking, create ornaments that represent your shared passion.
  • Pet Ornaments

  • Pet Portraits: Paint a simple portrait of your furry friend or create a fun silhouette of their favorite pose.
  • Paw Prints: Create a paw print ornament by pressing your pet's paw onto a piece of wood and then staining or painting it.
  • Pet Names: Write your pet's name on a wooden ornament with a cute dog or cat design.
  • Hobby and Interest Ornaments

  • Music Lover: Create a musical note ornament or a tiny guitar shape for your music-loving friend.
  • Bookworm: Paint a stack of books or an open book with a favorite quote on a wood ornament.
  • Travel Enthusiast: Design a small airplane, a compass, or a globe on a wood ornament.
  • Sports Fan: Create an ornament with your friend's favorite team's logo or a silhouette of their favorite athlete.
  • Materials and Tools

    You don't need a lot of fancy equipment or expensive materials to make beautiful personalized wood ornaments. Here are some basic supplies you'll likely need:

    Wood Ornaments

  • Wooden shapes: Look for pre-cut wooden ornaments at craft stores, online retailers, or even at your local hardware store.
  • Wooden slices: These natural-looking slices of wood can be easily drilled and hung as ornaments.
  • Wooden plaques: You can use these as a base for creating ornaments with multiple layers, or you can attach them to a pre-cut wooden shape.
  • Tools

  • Wood burning tool: This is great for creating detailed designs and lettering.
  • Sandpaper: Use different grit sandpaper to smooth out the wood and prepare it for painting or staining.
  • Paintbrushes: Choose brushes in different sizes for painting, depending on your design.
  • Scissors: Use scissors to cut out stencils or decorative paper elements.
  • Drill: Use a drill with a small bit to make a hole at the top of the ornament for hanging.
  • Pencil: Use a pencil for sketching your design before applying paint or burning the wood.
  • Measuring tape: This is helpful for ensuring your design is centered and properly scaled.
  • Ruler: Useful for drawing straight lines and precise measurements.
  • Paints and Finishes

  • Acrylic paints: These are easy to use and come in a wide variety of colors.
  • Wood stain: Choose a stain that complements the color of your wood ornament.
  • Clear sealant: Apply a sealant to protect your finished ornament from scratches and wear.
  • Glitter: Add some sparkle to your ornaments with glitter glue or fine glitter.
  • Fabric scraps: Use small fabric scraps to create accents or embellishments for your ornaments.
  • Tips for Creating Personalized Wood Ornaments

    Here are some tips to help you create beautiful and unique personalized wood ornaments:

    Plan Your Design

    Before you start, sketch out your design on paper. This will help you visualize how the ornament will look and ensure that you have all the necessary supplies.

    Practice on Scrap Wood

    If you're new to wood burning or painting, practice on a scrap piece of wood first. This will help you get a feel for the tools and techniques before working on your actual ornament.

    Use Stencils

    If you're not confident in your drawing skills, use stencils to create lettering or simple designs. You can find pre-made stencils at craft stores or create your own using cardstock or freezer paper.

    Add Layers

    To create a multi-dimensional look, add layers of paint, stencils, or even fabric scraps to your ornament.

    Finish with a Clear Sealant

    Once your ornament is painted or stained, apply a clear sealant to protect the finish and make it more durable.

    Enjoy the Process and the Gift

    Creating personalized wood ornaments is a fun and rewarding activity. It's a chance to express your creativity and create a truly meaningful gift that your loved ones will cherish for years to come. So grab your tools, gather your supplies, and start making some special ornaments that will bring joy and warmth to your holidays.

    Share:

    How to Build Wooden Toys That Encourage Imagination and Creativity

    How to Build Wooden Toys That Encourage Imagination and Creativity

    Building Wooden Toys That Spark Imagination and Creativity

    Hey there, fellow toy enthusiast! Are you looking for ways to bring some old-school charm and a dash of creativity into your child's playtime? Well, you've come to the right place. We're about to embark on a journey to build wooden toys that not only entertain but also inspire boundless imagination and creativity.

    Let's face it, there's something magical about wooden toys. They're tactile, durable, and timeless. They have a certain warmth and simplicity that electronic gadgets can't quite replicate. Plus, building them yourself adds a whole new dimension to the experience, giving you a chance to connect with your child, learn a new skill, and create something truly special.

    Why Wooden Toys Are a Winning Choice

    You might be wondering, "What makes wooden toys so great?" Well, let me tell you, the benefits are plentiful.

    • Durability: Wooden toys are built to last. They can withstand the wear and tear of active play, making them a wise investment that will be enjoyed for years to come. Think about it, how many plastic toys have you seen crack, break, or end up in the landfill after just a few months?
    • Safety: Wood is a natural material that's free from harmful chemicals and toxins. This makes it a safe choice for babies and toddlers who are constantly exploring the world with their mouths. No need to worry about your little one ingesting harmful substances.
    • Imagination and Creativity: Wooden toys often have a simpler design, which leaves more room for kids to use their imaginations. They can become anything the child envisions: a castle, a spaceship, a pirate ship... the possibilities are endless!
    • Open-Ended Play: Unlike toys with specific functions, wooden toys encourage kids to engage in open-ended play. This means there are no set rules, no right or wrong way to play, just pure creativity and exploration.
    • Sustainability: Wood is a renewable resource, making it a more eco-friendly choice than plastics, which are often derived from petroleum. By choosing wood, you're supporting sustainable practices and reducing your impact on the environment.

    Getting Started: Essential Tools and Materials

    So, you're ready to dive into the world of wooden toy building? Awesome! Let's gather the essential tools and materials you'll need to get started.

    Essential Tools:

    • Hand saw: This will be your go-to tool for cutting wood to size.
    • Measuring tape: Precision is key in woodworking. Use a measuring tape to ensure your cuts are accurate.
    • Sandpaper: Sandpaper is essential for smoothing out rough edges and creating a polished finish on your toy.
    • Screwdriver: You'll need a screwdriver for assembling your toy, especially if you're using screws.
    • Clamps: Clamps are helpful for holding pieces of wood together while you're working.
    • Safety goggles: Protect your eyes from sawdust and flying wood chips.

    Essential Materials:

    • Wood: Choose wood that is safe for children, such as pine, birch, or maple. Look for lumber that is smooth, free of knots, and free of splinters.
    • Wood glue: Wood glue is essential for bonding pieces of wood together. Select a high-quality glue that is specifically designed for woodworking.
    • Screws: If you're using screws, choose screws that are appropriate for the size and thickness of the wood you're using.
    • Paint or stain: You can add a touch of color or a natural finish to your wooden toy with paint or stain. Choose non-toxic paints and stains that are safe for children.
    • Sandpaper: You'll need sandpaper to smooth out rough edges and create a polished finish on your toy.

    Simple Wooden Toy Projects:

    Ready to start crafting? Here are some easy-to-follow, beginner-friendly wooden toy projects that will have you creating fun and imaginative playthings in no time.

    Wooden Blocks

    Wooden blocks are a classic toy that offers endless possibilities for play. You can build towers, create imaginative structures, or use them for storytelling.

    • What you'll need: Wood, saw, sandpaper, paint or stain (optional)
    • Instructions: Cut the wood into square or rectangular shapes. Sand the edges smooth. If desired, paint or stain the blocks.

    Wooden Animal Puppets

    Bring characters to life with these charming wooden animal puppets. Kids will love putting on puppet shows with their own handmade creations.

    • What you'll need: Wood, saw, sandpaper, paint, markers, glue, dowel rods (for puppet sticks)
    • Instructions: Cut out basic animal shapes from wood. Sand the edges smooth. Paint or color the animal shapes. Use glue to attach a dowel rod to the back of the puppet for easy handling.

    Wooden Train Set

    Introduce your child to the world of trains with a simple wooden train set. You can build a track, add carriages, and even create a train station.

    • What you'll need: Wood, saw, sandpaper, paint, wheels (you can find wooden wheels at craft stores)
    • Instructions: Cut pieces of wood to create the train track. Sand the edges smooth. Paint the track and assemble the carriages. Attach wheels to the carriages.

    Tips for Success:

    Here are some tips to make your wooden toy building experience even more enjoyable and rewarding.

    • Start with simple projects: Don't try to tackle too much too soon. Begin with simple projects like blocks or puppets. As you gain confidence, you can gradually move on to more complex designs.
    • Use high-quality materials: Investing in good-quality wood and tools will make a difference in the durability and appearance of your toys.
    • Measure twice, cut once: Accuracy is key in woodworking. Measure carefully before making any cuts to avoid mistakes.
    • Sand thoroughly: Sanding is essential for creating smooth, safe surfaces for children to play with.
    • Be patient and have fun: Woodworking takes time and practice. Don't get discouraged if your first few projects aren't perfect. Just relax, have fun, and enjoy the creative process.

    Inspiration and Ideas

    Need some inspiration for your next wooden toy project? The internet is a treasure trove of ideas! Check out online woodworking communities, blogs, and YouTube channels for tutorials, patterns, and inspiration. Here are a few places to get started:

    • Pinterest: Pinterest is a great place to find ideas for wooden toys, with countless images and tutorials to inspire your next project.
    • YouTube: YouTube is filled with woodworking videos, from beginner-friendly tutorials to advanced techniques. Search for "wooden toys" or "diy wooden toys" to find a wealth of inspiration.
    • Woodworking Forums: Connect with other woodworkers online to share ideas, ask questions, and get feedback on your projects.

    Conclusion

    Building wooden toys is a rewarding and fulfilling experience that will bring joy to your child and enrich their playtime. So, gather your tools, choose your project, and let your creativity flow! You'll be amazed at what you can create, and your child will treasure the handmade toys you've made for them. Happy building!

    Share:

    Simple Sign-Making Techniques for Beginner Woodworkers

    Simple Sign-Making Techniques for Beginner Woodworkers

    Simple Sign-Making Techniques for Beginner Woodworkers

    Hey there, fellow woodworkers! Ever wanted to craft a beautiful, personalized sign for your home, garden, or even as a gift? It's a fantastic project for beginner woodworkers, and it's surprisingly easy to learn! In this article, we'll break down the essential techniques, materials, and tools you'll need to get started. So grab your safety glasses, dust off your saw, and let's dive into the world of sign-making!

    Choosing Your Wood

    The first step is selecting the perfect wood for your sign. You have tons of options, but here are some popular choices:

    Pine

    Pine is affordable, lightweight, and easy to work with. It's a great choice for beginners. Just be mindful that pine is soft and can dent easily, so handle it with care!

    Cedar

    Cedar is known for its beautiful reddish-brown color and its natural resistance to insects and decay. It's a bit more expensive than pine, but it's worth the investment if you want a durable and attractive sign.

    Redwood

    Redwood is a classic choice for outdoor signs due to its weather resistance and stunning reddish hue. It's also very strong and durable, making it perfect for signs that will be exposed to the elements.

    Plywood

    Plywood is a versatile and affordable option, especially for larger signs. It's strong, stable, and comes in various thicknesses, making it ideal for both indoor and outdoor projects.

    The choice ultimately comes down to your personal preference, budget, and the intended use of your sign.

    Cutting Your Sign

    Once you have your wood, it's time to give it the desired shape! Here are some tools you can use:

    Hand Saw

    A hand saw is a basic tool for cutting wood. It's a great option for straight cuts and simple shapes. Just be sure to use a saw that's sharp and appropriate for the type of wood you're working with.

    Jigsaw

    A jigsaw is perfect for cutting intricate curves and designs. It's a bit more advanced than a hand saw, but it gives you more freedom to create unique shapes.

    Table Saw

    A table saw is a powerful tool that allows for precise cuts and smooth finishes. It's ideal for creating straight cuts and for cutting multiple pieces of wood to the same size. Always be careful and use safety precautions when operating a table saw!

    Remember to measure carefully before you cut! It's also a good idea to practice your cuts on a scrap piece of wood first.

    Adding Some Charm: Letters and Designs

    Now comes the fun part: adding the text and designs that make your sign unique! Here are a few techniques:

    Hand-Lettering

    Hand-lettering gives your sign a personal touch. You can use stencils, tracing paper, or simply freehand your letters. Experiment with different fonts and styles to find what you like best.

    Router

    A router can carve out letters and designs with precision. It's a more advanced technique, but it allows you to create stunning three-dimensional lettering. Be careful and use safety precautions when using a router.

    Paint or Stain

    Paint is a versatile way to add color and contrast to your sign. You can choose from a wide range of colors and finishes to match your style. Stain is another option that allows the natural beauty of the wood to shine through.

    Decoupage

    Decoupage involves using paper, fabric, or other materials to create a collage on your sign. It's a fun and easy way to add texture and visual interest to your work.

    Don't be afraid to experiment and get creative! There's no right or wrong way to decorate your sign, so have fun with it!

    Finishing Touches: Protecting Your Sign

    Once you've completed your design, it's essential to protect your sign from the elements and wear and tear. Here's how you can seal it:

    Polyurethane

    Polyurethane is a clear, durable sealant that's ideal for outdoor signs. It provides a protective layer that resists moisture, UV rays, and scratches.

    Acrylic Varnish

    Acrylic varnish is another popular choice for signs. It dries quickly, is water-based, and offers good protection against moisture and UV damage.

    Wax

    Wax is a natural sealant that gives wood a beautiful sheen. It's a good option for indoor signs or for adding a rustic look to outdoor signs.

    Apply the sealant according to the manufacturer's instructions. Make sure to let it dry completely before handling your sign.

    Extra Tips and Ideas for Success

    Here are some additional ideas to make your sign-making journey even more enjoyable:

  • Plan your design beforehand: Sketch out your sign on paper to get an idea of the layout, fonts, and overall look before you start cutting or painting.
  • Use a level: To ensure your sign is straight and level, use a level to check its alignment during construction.
  • Use quality tools: Invest in good-quality tools that are appropriate for your project. This will make your work easier and produce better results.
  • Don't be afraid to make mistakes: Even experienced woodworkers make mistakes! Don't let a small mistake ruin your project. Just learn from it and try again!
  • Have fun! Sign-making is a creative and rewarding hobby. Enjoy the process and be proud of your finished work!
  • Remember, the beauty of woodworking lies in the journey, not just the destination. So relax, experiment, and have fun creating your own unique signs!

    Share:

    Step-by-Step Beginner Woodworking Projects That Anyone Can Tackle

    Step-by-Step Beginner Woodworking Projects That Anyone Can Tackle

    Step-by-Step Beginner Woodworking Projects That Anyone Can Tackle

    Woodworking is a rewarding hobby that allows you to create beautiful and functional pieces for your home or as gifts. Whether you're a complete novice or have some basic experience, there are plenty of beginner woodworking projects that are easy to tackle and provide a sense of accomplishment. This guide will walk you through some simple yet satisfying projects, providing step-by-step instructions and tips for success.

    Essential Tools and Materials

    Before diving into any woodworking project, it's important to have a basic set of tools and materials. While you can always add more tools as your skills progress, these essentials will get you started:

    Tools

    • Measuring Tape: Essential for accurately measuring and cutting wood.
    • Saw: A handsaw or a jigsaw is a good starting point for cutting wood. A circular saw can be used later on.
    • Hammer: Used for driving nails and assembling pieces.
    • Screwdriver: A set of screwdrivers (Phillips and flathead) is necessary for attaching components.
    • Clamps: Used to hold pieces together securely while you work.
    • Safety Glasses: Always wear safety glasses to protect your eyes from flying debris.
    • Work Gloves: Protect your hands from splinters and sharp edges.
    • Pencil or Marker: For marking wood before cutting or drilling.
    • Sandpaper: For smoothing wood and creating a finished look.

    Materials

    • Wood: Pine, plywood, and MDF are good beginner woods due to their affordability and ease of workability.
    • Screws and Nails: Choose appropriate lengths and types for your project.
    • Wood Glue: Used to bond wood pieces together.
    • Finishing Supplies: Stain, paint, or varnish to protect and enhance the wood.

    Simple Beginner Woodworking Projects

    Now, let's explore some beginner-friendly projects that will help you build confidence and skills:

    1. Wooden Coasters

    This project is perfect for beginners as it requires minimal tools and materials. You can make simple square or round coasters, or get creative with shapes like stars or hearts.

    1. Cut the Wood: Choose a wood like maple or cherry for a beautiful grain pattern. Cut four squares or circles using a jigsaw or handsaw.
    2. Sand the Edges: Use sandpaper to smooth out the edges and remove any rough spots.
    3. Apply Finish: Choose a wood finish like polyurethane or varnish to protect the coasters from spills and stains.
    4. Add Felt Pads: Attach felt pads to the bottom of each coaster to prevent scratching surfaces.

    2. Wooden Picture Frame

    A picture frame is a classic woodworking project that can showcase your favorite photos or artwork.

    1. Cut the Frame Pieces: Measure the photo or artwork you want to frame and cut four pieces of wood to create the frame.
    2. Assemble the Frame: Use wood glue and clamps to join the frame pieces together. You can also use miter joints for a more professional look.
    3. Add a Backing: Cut a piece of plywood or cardboard to fit inside the frame and serve as a backing.
    4. Attach Hanger: Add a sawtooth hanger to the back of the frame for easy hanging.
    5. Finish the Frame: Stain, paint, or varnish the frame to your liking.

    3. Simple Shelf

    A shelf is a functional and stylish addition to any room. You can create a shelf for books, plants, or decorative items.

    1. Cut the Shelf Pieces: Measure the desired length and width of the shelf and cut two pieces of wood for the shelf supports. Cut one piece for the shelf itself.
    2. Assemble the Shelf: Use screws or dowels to attach the shelf supports to the wall or a tabletop. Attach the shelf to the supports.
    3. Finish the Shelf: Sand and stain or paint the shelf for a finished look.

    4. Wooden Cutting Board

    A cutting board is a kitchen essential that adds a touch of warmth and personality.

    1. Choose Wood: Choose a hardwood like maple or walnut for a durable cutting board. You can also use bamboo for a more eco-friendly option.
    2. Cut the Board: Cut the wood to the desired size and shape.
    3. Sand the Board: Smooth out the edges and surfaces of the board with sandpaper.
    4. Apply Mineral Oil: Treat the board with mineral oil to protect it from moisture and stains.

    Tips for Successful Woodworking

    Here are some tips to keep in mind as you embark on your woodworking journey:

    • Start Small: Begin with smaller projects to gain experience and build confidence before tackling more complex tasks.
    • Measure Twice, Cut Once: Always double-check your measurements to ensure accurate cuts and prevent mistakes.
    • Use the Right Tools: Choose the appropriate tools for each task to ensure clean and safe work.
    • Practice Safety: Always wear safety glasses and gloves, and work in a well-ventilated area to prevent injuries.
    • Don't Be Afraid to Ask for Help: If you're struggling with a step or technique, don't hesitate to ask for guidance from a more experienced woodworker.

    Conclusion

    Woodworking can be a rewarding hobby that allows you to create beautiful and functional pieces. By starting with simple projects and following these tips, you can build your skills and confidence as a woodworker. Remember to have fun, be patient, and enjoy the process of bringing your ideas to life!

    Share:

    Postingan Populer

    Search This Blog

    Powered by Blogger.

    Blog Archive

    Recent Posts

    Pages

    Theme Support