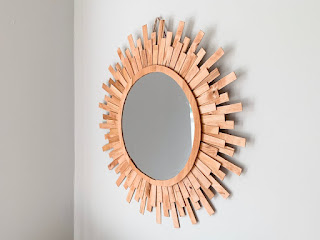
Mirror Woodworking Plans for Unique Home Decor
Hey there, fellow DIY enthusiasts! So you're looking to add some seriously stylish and unique flair to your home, and you've landed on the idea of incorporating mirrors with woodworking. That's awesome! Mirrors aren't just functional; they're fantastic decorative elements, and when you combine them with the warmth and character of wood, you're talking about a home decor upgrade that's truly special. This isn't your grandma's plain old mirror – we're going to explore some seriously cool woodworking projects that will make your home shine (literally!).
Getting Started: Tools and Materials
Before we dive into specific projects, let's talk about the essentials you'll need. Don't worry, you don't need a fully equipped workshop to pull this off! Most of these projects are achievable with common tools and materials, but having the right stuff will make the process smoother and safer.
Essential Tools:
- Measuring Tape: Accuracy is key, especially when working with mirrors.
- Pencil: For marking your cuts and designs.
- Saw (Handsaw, Jigsaw, or Circular Saw): Choose the saw that best suits your skill level and the project's complexity.
- Wood Glue: A strong wood glue is essential for secure joints.
- Clamps: To hold pieces together while the glue dries.
- Sandpaper (Various grits): For smoothing surfaces and achieving a professional finish.
- Screwdriver (or Drill): Depending on the design, you may need screws.
- Safety Glasses and Dust Mask: Always prioritize safety!
Essential Materials:
- Wood (various types): Consider using hardwoods like oak, maple, or walnut for durability and a beautiful finish. Softwoods like pine are also suitable for some projects.
- Mirrors: You can find mirrors at most home improvement stores. Make sure to accurately measure your frame before purchasing.
- Wood Finish (Stain, Paint, or Varnish): Choose a finish that complements your home's style and the type of wood you're using.
- Fasteners (Screws or Nails): If necessary for your design.
Mirror Woodworking Project Ideas
Now for the fun part – let's brainstorm some amazing mirror projects!
1. The Classic Framed Mirror:
This is a great starting point for beginners. Choose a wood type, cut the pieces to the desired size (remember to account for the mirror's dimensions!), and assemble the frame using wood glue and screws or nails. Sand it smooth, apply your chosen finish, and voila! A beautiful, classic framed mirror.
2. The Geometric Mirror:
Get creative with shapes! Instead of a simple rectangle or square, construct a frame with interesting geometric patterns. Think triangles, hexagons, or even more complex designs. This project requires a bit more precision in cutting, but the final result is stunning.
3. The Rustic Mirror:
Embrace a more natural, rustic look by using reclaimed wood or leaving some of the wood's natural imperfections visible. A distressed finish or a natural wood stain will enhance the rustic charm. This style perfectly complements farmhouse or bohemian decor.
4. The Modern Minimalist Mirror:
For a sleek, contemporary feel, opt for a simple, clean frame made from a single type of wood. A minimalist frame allows the mirror itself to be the focal point, making it perfect for a modern or mid-century modern aesthetic. Consider using a dark stain or a clean, white finish.
5. The Ornate Mirror:
If you're feeling ambitious, you can create a highly detailed and ornate frame. This could involve intricate carvings, moldings, or even the incorporation of other materials like metal or glass. This is a challenging project but the reward is a truly unique and stunning piece.
Tips for Success
Here are a few tips to make your mirror woodworking project a success:
- Measure twice, cut once: This age-old adage is especially important when working with mirrors. Inaccurate cuts can ruin your project.
- Use the right tools: Investing in quality tools will make the job easier and safer.
- Take your time: Don't rush the process. Careful and precise work will result in a better-looking, more durable final product.
- Practice your cuts: If you're using a new tool or technique, practice on scrap wood first.
- Sand thoroughly: Smooth surfaces are crucial for a professional-looking finish.
- Protect your work surface: Use a drop cloth or other protective covering to avoid damaging your work area.
- Have fun!: Remember to enjoy the process! Woodworking is a rewarding hobby, and creating something beautiful for your home is even more satisfying.
Commonly Asked Questions
Here are some questions I often get about mirror woodworking projects:
Q: What type of wood is best for mirror frames?
A: Hardwoods like oak, maple, and walnut are excellent choices for their durability and beautiful grain. However, softer woods like pine can also work well, especially for simpler projects.
Q: How do I attach the mirror to the frame?
A: You can use strong adhesive specifically designed for mirrors, or you can use small mirror clips that are hidden behind the frame. Ensure the adhesive or clips are rated for the weight of your mirror.
Q: What kind of finish should I use?
A: The best finish depends on your desired look. Stain enhances the wood grain, paint provides a solid color, and varnish protects the wood and provides a glossy or satin sheen.
Q: Can I use reclaimed wood for my mirror frame?
A: Absolutely! Reclaimed wood adds character and a unique touch to your project. Just make sure the wood is clean, dry, and stable before you start working with it.
Q: Where can I find woodworking plans?
A: You can find numerous woodworking plans online, through woodworking magazines, or even at your local library. There are also many videos on platforms like Youtube that can help you visually learn techniques.
I hope this guide inspires you to create your own stunning mirror woodworking project! Remember to always prioritize safety, take your time, and most importantly, have fun! Happy crafting!


No comments:
Post a Comment
Note: Only a member of this blog may post a comment.